Ski Waxing and Edge Sharpening
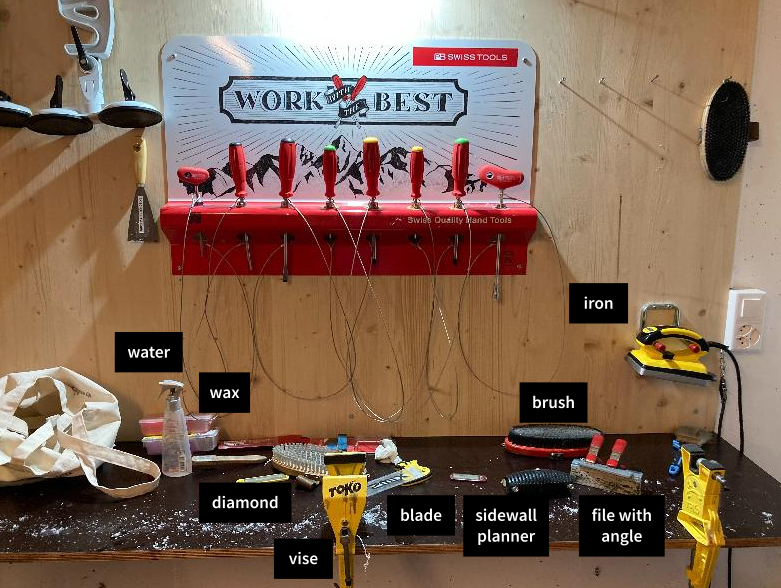
Some notes from the crash course on ski waxing and edge sharpening. Get inspired by some ideas for your personal waxing or ski preparation setup at home.

#savognin #snowsports #equipment
Waxing Process
- Make the edges smooth and sharp first before waxing
- Use a (steel/nylon) brush to clean the ski first. Brushing direction: from the front to the back
- Temperature for the waxing iron: Ideally between 120-130 °C (for “blue” wax 135 °C)
- Wax for cold temperatures sticks longer (“purple” up to -10 °C)
- Choose the “red” wax in case of doubts
- Release the middle vise for waxing (no tension on the ski)
- Apply waxing iron 3 to 4 times slowly, make sure not to use too much (drips on the side) or too little wax (harmful for the coating)
- Immediately remove excess wax from the edges
- Wait 10-20 minutes for the wax to sink into the coating
- For removing the excess wax from the coating clamp the ski to the middle vise again
- Use the plexi blade to remove the excess wax from the entire coating from front to back (pushing might be easier than pulling)
Edge Sharpening Process
- Use the planer to remove the plastic sidewalls (especially on new skis)
- Spray some water 💦 on the diamond 💎
- Remove the brows with the diamond (200 coarseness)
- This step is a quick win, remove the brows frequently to smooth the edges
- Optionally, use a 400 diamond (less coarse than the 200) for polishing
- Diamond treatment does not take away material from the edges and can be repeated quite frequently
- Optionally, use a side angle (88° or 87° for aggressive 3° race angle)
- Don't use the aggressive 3° angle for casual skiing, the edge is also destroyed faster again and you need to resharpen every week or so
- Only actually file the edges (remove material from the edges) every third or fourth time you perform the edge tuning. Most of the time you should be fine by just removing the brows with the diamond.
- Bring the ski to a shop from time to time to make the edges with the machine
- Always remove the brows before applying the base file which removes material
- The file always has a direction in which it should be applied, watch out for the small arrow on the file (it will feel wrong and not work the other way around 😅)
- You will definitely need an angle (88°/87°) to apply the base file which removes material from the edges
- Re-apply the diamond after the base file
- Use an edge grinding rubber to smoothen scratches in the edges or to reverse the edge sharping a bit (break the edge again, which you might need to do on nose/tail a few cm if the edge is too aggressive)
Waxing Equipment
To rebuild a similar setup use equipment and a shopping list similar to this one here:
- Ski vise
- Red wax
- Blue wax
- Wax iron
- Plexi blade
- Brush
- Sidewall planer
- 200 diamond file (to remove brows and polish)
- Water sprinkler
- Base file (to remove material)
- Side angle 88°/87°
- Edge grinding rubber
💡Pro tip: Instead of buying the sidewall planer, the base/diamond file, the side angle and edge grinding rubber separately, consider an all-in-one Tooltonic Set. I bought one myself – a very handy starter package, portable, good quality, swiss made 🫕